For many months I've carried a notion around in the back of my head: Of turning the master bedroom of our home into a large studio / family art room, and our small third bedroom (my current work room) into our main bedroom instead. But I have begun to realise that this daydream of mine actually makes a lot of sense. The biggest room in the house is one we use the least, I really need more room to work, and the thought of having a place we can all make stuff together family-style is really appealing to me. (My partner and love Charles is also an artist: he can draw like crazy!)
So it has begun: the big room switcheroo, which consists mostly of me trying to move a lot of crap around, Adelaide moaning away, and Elliot all upset and attacking himself because he thinks we're moving again. It's painfully slow-going. All of our stuff is all over everywhere, and I'm not exactly sure what the plan is yet. One thing I do know is that I want to have myself and Adelaide's bedroom set up as soon as possible. (Adelaide and I share a bed and room and Charles has his own, for he is not a pleasant bed-sharer, and must wake up much earlier than us). So I've been focusing on trying to have our new little bedroom cozy first of all.
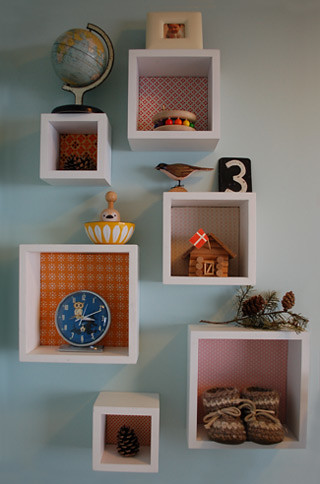
Today I worked a little on arranging some more of our new bedroom. I've always loved The Purl Bee's Swatch Portraits, so when I came across some old square white cubbi shelves of mine I realised that they would be perfect for making some fabric swatch shelves!

To make them, I first went through my fabric stash and picked out six favourites. I then traced the inner edge of the shelves onto some corrogated cardboard which I salvedged from a packing box, and cut them out. Next I ironed my fabric, and placed it below my corrogated square cut-out. Next, I trimmed all around it, leaving about a 1" border. I then folded over the extra fabric onto the back of the cardboard and taped it snugly using some regular sticky tape. Simple!

To hang the cubbies, I traced them onto some scrap paper, marked where the hanging holes are, and used these silhouettes to figure out how to arrange and hang them on our wall. Adelaide loved helping me with this, and once the cubbies were hung, we popped in the fabric inserts and added some of our favourite treasures.
I only wish I had more of these shelves, I think it would be great to have a entire wall done up like this with their sweet fabric swatch-backs. They've got me thinking of saving up some of my spare change and adding more to our treasure wall one day!


0 comments:
Post a Comment